How to add a vertical line Squarespace 7.0 & 7.1

Vertical lines are a simple yet effective design element that can significantly enhance the aesthetic appeal of your Squarespace website. They add structure, create visual interest, and can guide the viewer’s eye through your content.
If you’re like me and you love organized layouts, vertical lines can do wonders to make your design clean without making them overwhelming.

Unfortunately there Squarespace does not have a vertical line block. We need to use CSS to add a vertical line to your Squarespace website. But not to worry, the CSS code is fairly simple and I’m here to break it down for you.
Now grab your coffee and laptop and let’s get started.
We’re going to talk about two methods here. I prefer method 2. It’s easy and works for most purposes.
Method 1: Add a vertical line in Squarespace using HTML and CSS:
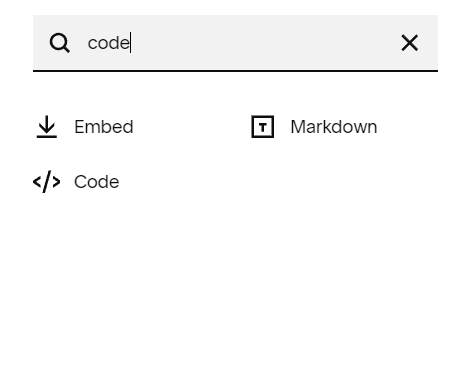
Go the the section you want to add the line in. Click on “Add Block” and Select Code
In the HTML code block add:
<div class="vertical-line"></div>
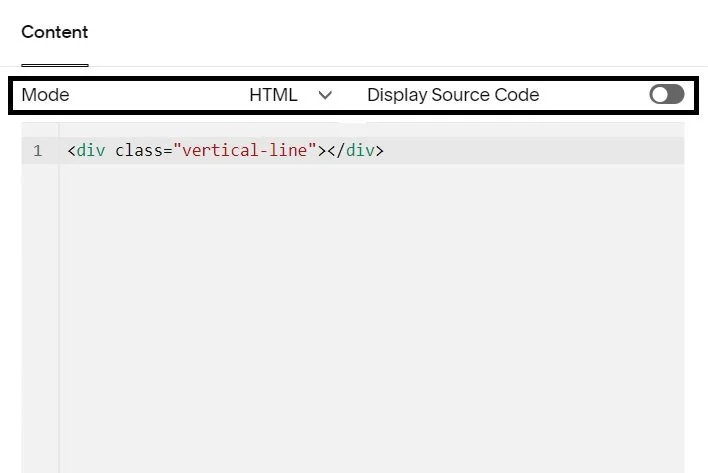
Adding this code won’t make the line visible. To see the vertical line you need to style it in the CSS editor.
To access the CSS editor in Squarespace 7,1 go to Website>Website Tools>Custom CSS.
To access the CSS editor in Squarespace 7.0 go to Website>Pages>Website Tools>Custom CSS.
.vertical-line {
  background: #000000; /* You can change the color (#000000) as needed */
  width: 2px; /* You can change the width (2px) as needed */
  height: 100px;  /* Adjust the height of the line as needed */
  margin-left: -1px; /* Half of the width to center the line */
}
For a lot of website designs, having a vertical line in the mobile layout may not be very useful!. If you want this vertical line to only appear on the desktop version of your website add the condition as below:
@media screen and (min-width: 768px) {  /* Ensures the line is only shown for desktop screens*/
   .vertical-line {
    background: #000000; /* You can change the color (#000000) as needed */
    width: 2px; /* You can change the width (2px) as needed */
    height: 100px;  /* Adjust the height of the line as needed */
    margin-left: -1px; /* Half of the width to center the line */
   }
}
You should see a vertical line now visible in your section.
Here’s a bit on an explanation to what this code does:
@media screen and (min-width: 768px) { ... } : This is a media query that applies the enclosed styles only if the screen has a minimum width of 768 pixels. In other words, this ensures that the vertical line is designed to show up only on bigger screens, like desktop computers, where the screen is at least 768 pixels wide.
.vertical-line { ... }: This CSS rule targets an HTML element with the class `.vertical-line`. In this case this will target the the HTML element (`<div>`) we created.
background: #000000: Thissets the background color of the vertical-line to black (`#000000`). You can change this color code to any other color of your choice.
width: 2px: This specifies the width of vertical line as 2 pixels. You can adjust this value based on how thick you want your vertical line to be.
height: 100px; This sets the height of the vertcal line to 100 pixels. You can modify this value to control the vertical length of the line.
margin-left: -1px; This Positions the vertical by adjusting its left margin. In this case, it's set to `-1px`, which is half of the width (`2px`). This is used to center the vertical line within its container. You can adjust this value if needed based on your specific layout.
Note: If you want to have vertical lines of different sizes or properties, like different colors, etc. you will need to create classes with different names for each typeof line.
If you'd like more pieces like this, you can subscribe to the journal. New essays, in depth analysis on all things technology, design and business. Roughly once a month.
Method 2: Add a vertical line in Squarespace by rotating the existing horizontal line
If you don’t want to write a new class, you can create a vertical line by rotating the existing horizontal line.
To use this method, first create a horizontal line using the “Line” block.
Now find the block ID of the line using the Squarespace ID finder tool.
#block-1234567890 { //replace the block id with the block id for the horizontal line
    transform: rotate(90deg)
    }
transform: the transform property applies the rotate() transformation, which allows you to rotate an element by a specified angle. In our case that angle is 90 degrees. thus transforming the existing horizontal line to a vertical line.
Now, You can use the same condition as above if you want the vertical line to appear only on the desktop version of your Squarespace website.
The complete code will then be like this:
@media screen and (min-width: 768px) {  /* Ensures the line is only shown for desktop screens*/
#block-1234567890 //replace this with the block id for line
    {
      transform: rotate(90deg)
    }
}
Here’s a simple video to help you with creating a vertical line in Squarespace using this method.
add vertical line in SquareSpace-step by step video on how to add a vertical line in Squarespace
And if your Squarespace site needs more than a how-to, I design custom sites for coaches, therapists, and creative brands.
Looking for some more CSS tricks, read these next
About me:
Hi I’m Aneet. I’m a Seattle-based website designer. My love for design & code is only matched by my appreciation of classic novels, history, and music from eras before I was born (maybe I’m an old soul). I love solving problems through strategy, design or code. I love 1:1 conversations that make you lose track of time. If you want to connect feel free to reach out on Instagram @brandunpuzzled (Instagram is where I hang out, at least on DMs!)