How to add and upload custom fonts in both versions of Squarespace
While Squarespace generously provides a range of font options for your website, there might be instances where you're searching for a specific custom font to align with your branding or achieve a particular visual effect. If you find that your desired font isn't readily available in the Site Style options, worry not, you can effortlessly upload ANY font to Squarespace.
With bold and beautiful typography becoming a part of the new design trends having an impactful font that complements your visuals can be a game-changer for your website design. But before we get started with uploading custom fonts , make sure you have a proper license for the font you’re trying to add. If you are looking for free fonts, there are plenty of resources like Font Squirrel or Google Fonts that offer free fonts, or Creative Market for beautiful custom fonts for purchase.
Now download that font you like and grab your laptop and coffer. Let’s get started!
Step 1: Upload Your Font Files
Before you start, make sure your font files are in .otf, .ttf or .woff format, as these are the formats Squarespace supports.
The only difference between 7.0 and 7.1 is where you will find the CSS editor.
For Squarespace 7.1 version:
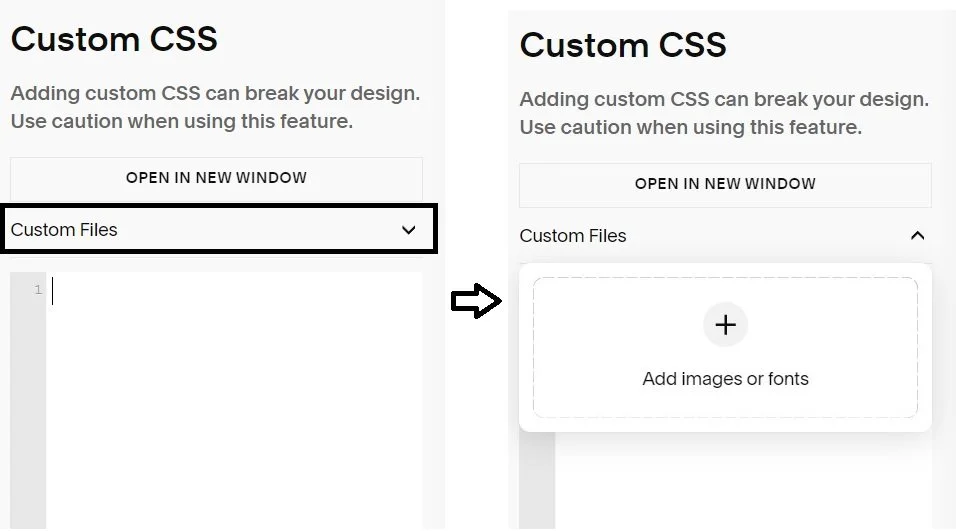
1. Go to Website>Website Tools > Custom CSS
2. Click on the “Custom files” dropdown
3. Click on the ‘+’ icon to upload your font or simply drag and drop your font file.
For Squarespace 7.0 version:
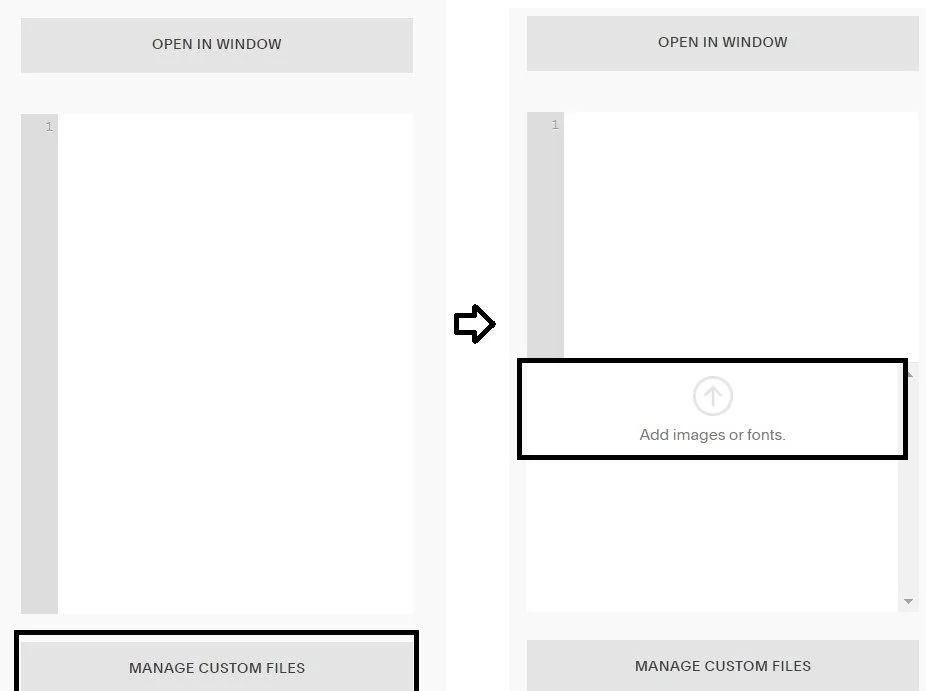
1. Go to Website> Pages > Website Tools > Custom CSS
2. Once you are in the CSS editor scroll down to the bottom, and click “Manage Custom Files”.
3. Click on the arrow icon to upload your font or simply drag and drop your font file.
Step 2: Add CSS Code for Your Font
After uploading your font files, you need to add CSS code to use them. Here’s an example of what the code might look like:
@font-face {
    font-family: 'Your Font';
    src: url('Your-Font-File.woff') format('woff');
    font-weight: normal;
    font-style: normal;
}
Replace 'Your Font' with the name you want to use for your font, 'Your-Font-File.woff' with the URL of your uploaded font file and ‘woff’ with the font format of your font.
Step 3: Apply Your Font
Now you can use your custom font anywhere on your site with CSS. Here’s an example of how to apply your font to all paragraph text:
p {
    font-family: 'Your Font';
}
Replace 'Your Font' with the name you used in your @font-face rule.
(Optional) Step 4: Stylize your font
You can style your custom font using CSS properties. Here's an example of how to change the font size, color, and line height of all paragraph text:
p {
    font-family: 'Your Font';
    font-size: 16px;
    color: #333333;
    line-height: 1.5;
}
In this example:
- `font-size: 16px;` sets the font size to 16 pixels.
- `color: #333333;` sets the font color to a dark gray.
- `line-height: 1.5;` sets the line height to 1.5 times the font size.
You can adjust these values to suit your needs. Remember to replace `'Your Font'` with the name you used in your `@font-face` rule.
If you'd like more pieces like this, you can subscribe to the journal. New essays, in depth analysis on all things technology, design and business. Roughly once a month.
Join the list →